# Vendor Request
{% hint style="info" %}
This feature is included within [Charted AP Automation](https://squareworks.com/automate-ap-automation-suite/) Suite.
{% endhint %}
## Installation
The Vendor Request feature is available as a NetSuite Bundle that can be downloaded and installed in your NetSuite environment after a license has been purchased.
1. Log into your **NetSuite** account with the **Administrator** role
2. Navigate to **Customization > SuiteBundler > Search & Install Bundles**
3. Search for the keyword **289947**
4. Click on the bundle name (**Charted: Vendor Request**)
5. Press Install
6. On the **Preview Bundle Install** screen, press **Install Bundle**
7. You will be redirected to a list of installed bundles in your account. Wait for the bundle to install. Once installed, you will see a green check mark in the status column.
## Configuration
The **Charted** **Vendor Request Bundle** has two configuration options that may be configured before utilizing the bundle:
1. **Adjust the Vendor and Vendor Address Request Forms**
The **Charted** Vendor Request Bundle comes with a set of pre-defined fields that are available in the Vendor and Vendor Request Forms. Both forms can be modified using standard NetSuite customization form procedures to adapt the form to your company’s requirements. If you have any questions, please contact **Charted.**
1. **Add Custom Mappings to the Vendor and Vendor Address Request Forms**
The **Charted** Vendor Request Bundle provides the ability to have custom mappings so that existing or new fields that are not linked out of the box when approving vendors, can be added with a simple configuration setting.
### Adjusting the Vendor and Vendor Address Request Forms
*Important*: Never edit the **custom forms** that come out of the box with the **Charted** Vendor Request Bundle. If you need to make modifications, make a copy of the existing form and use the newly saved form to make your changes.
Don’t edit any of the **custom record fields**. If you need changes, ensure you create a new field, give it a new name/ID, expose it to your custom form and then define a mapping using the **Bundle’s Configuration** options (See **Adding Custom Mappings** section).
1. Navigate to **Customization > Lists, Records, & Fields > Record Types**\
\
\
\
2. Locate and click on the record that you’d like to modify (either the **Vendor Request or the Vendor Address Request Record**)\
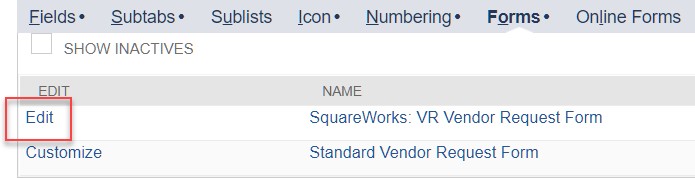
3. Go to the **Forms** tab and click on **Edit** next to the “**Charted**…” Form listed:\
4. Make any necessary adjustments to the Form. For additional information on how to modify Forms, create or edit Fields or any other changes, please contact a **Charted** representative.
5. Once you are done with your changes, make sure you update the name of the Form (to avoid replacing the out of the box Custom Form) and click **Save As**.
### Adding Custom Mappings
1. Navigate to Setup > Company > General Preferences
2. Within the Custom Preferences tab, locate the fields Custom Vendor Request Mappings and Custom Vendor Address Request Mappings.
3. Identify the field IDs on the Vendor Request/Address record type and the Vendor record type.
4. Add a new line to the Custom Vendor Request Mappings or to the Custom Vendor Address Request Mappings Fields using the format below:\
\
\&#xNAN;*\,\*\
\
For example, if you want to map the field on the Vendor Request Form customrecord\_sw\_vr\_addr1 to the field addr1 on the Vendor Record, then you would enter a new line as follows:\
\
\
\
5. Once you’ve verified that all fields have been properly mapped and all ID’s are correct, click **Save** and the bundle will use the mapping configured in this field to ensure that all fields are copied over from the Vendor Request or Vendor Address Request Forms to the Vendor Record in NetSuite.