> For the complete documentation index, see [llms.txt](https://docs.charted.com/ap-automation/llms.txt). Markdown versions of documentation pages are available by appending `.md` to page URLs; this page is available as [Markdown](https://docs.charted.com/ap-automation/charted-features/payment-automation/completing-the-invitation-and-selecting-a-payment-method.md).
# Completing the Invitation and Selecting a Payment Method
### Abstract
The payment onboarding process in **Charted** allows vendors to securely submit and manage their contact and payment information without manual intervention from administrators. This process begins when an administrator sends a secure invitation email, prompting the payee to complete onboarding by reviewing contact details and selecting a preferred payment method.
Businesses can configure whether to offer *ACH*, *Check*, or both, giving vendors flexibility. The payee onboarding reduces administrative overhead, improves data accuracy, and helps ensure that payments and remittance notifications reach the right contact.
This article provides a step-by-step guide to completing the payment onboarding process in **Charted** from the payee’s perspective. It covers how to open the secure invitation email, review or update contact details, and choose preferred payment method.
### Completing the Invitation: Payee Perspective
When a payee receives an invitation email, they can securely enter or confirm their payment and contact information through a private URL. The onboarding page allows the payee to keep an existing payment method or add a new one, choose a payment method preference (**ACH** or **Check**), choose whether they are acting as an individual or on behalf of a business, and specify who should receive payment remittance emails.
Follow these steps to complete the invitation and submit any updates:
1. An invited payee will receive an email that looks like this:\
\
\
This email will have the business entity name, a logo (optional), and a URL to complete the invitation.\
2. Next, click the **Update Payment Information** button, which will take the payee to the **Payment Onboarding** page:\
Here, if a payee already has a payment method on file, it will display **Update Payment Method on File**. Vendors with payment method information already on file do not have to complete the payee onboarding form. \
3. On this page, the payee can update their address information like **First Name**, **Last Name**, **Email**, **Phone Number**, and any contact info that might change:\
4. Next, there are two different routes here on this page: **I Represent a Business**, and **I'm an Individual**, so the payee is either representing the business or is an individual:\
5. When the payee selects the **I'm an Individual** option, it is just like a consumer payment and looks like this:\
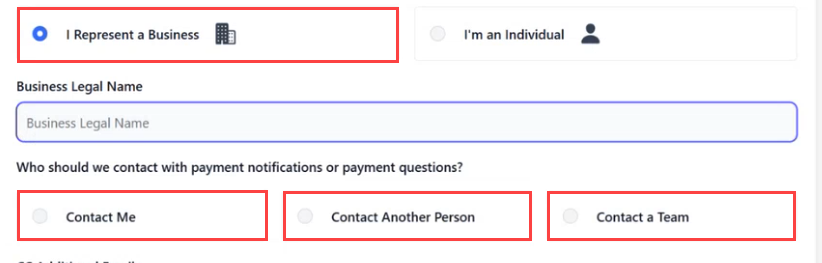
6. When they select the **I Represent a Business** option, they will need to enter a **Business Legal Name**, which is going to be reflected in the database as well:\
7. When choosing this option, the payee will see a few different options for contact information: **Contact Me**, **Contact Another Person**, and **Contact a Team**:\
8. The payee can choose the **Contact Me** option, which will send remittance emails to their email address:\
9. The payee can also choose the **Contact Another Person** option, which essentially creates a new payment contact, and they will need to enter **First Name**, **Last Name**, **Email**, and **Phone Number**:\
A payment contact is someone who will receive that email when a payment is sent or delivered. A series of remittance emails is delivered throughout the payment's life cycle. The payment contact is the person tied to that payee who will receive that information.\
10. And finally, the payee can choose the **Contact a Team** option and enter the team's **Name**, **Email**, and **Phone Number**:\
11. In this case, we'll select the **I Represent a Business** option and enter the **Business Legal Name**. Next, we'll choose the **Contact Me** option and click the **Next** button to proceed:\
### Selecting a Payment Method
Selecting a payment method establishes how vendors will receive payments during onboarding. This step ensures accurate financial details setup and supports reliable payment processing aligned with your organization’s policies.
Follow these steps to complete payment method selection:
1. After completing the invitation step, the payee will be prompted to choose a payment method. The available options are **ACH (US Banks Only)** and **Check (US Only)**:\
\
\
The payee can select **ACH**, **Check**, or both, depending on what their business allows. As a business sending out the invitation, you can ultimately give permission to include **ACH**, **Check**, or both as options. For example, you can control **ACH** only from the **Business Entity Settings** page.\
2. Let’s first select the **ACH (US Banks Only)** option to view its configuration options. When this option is selected, the payee may see two choices: **Use Existing Payment Method** or **New Payment Method**:\
3. The payee can choose the **Use Existing Payment Method** option if your banking details are already on file. This option allows them to review and confirm the existing routing number before proceeding:\
4. The payee can also choose the **New Payment Method** option if their bank account information has changed. This allows them to enter new bank details:
5. It’s important to note that a backup payment method, which refers to the **Check** address information, is always required when selecting **ACH**. This ensures that if an ACH payment fails, a check can still be sent to the provided address:\
6. Now, let’s select the **Check (US Only)** option to review its setup. When this option is selected, the payee may be able to choose the **Use Existing Payment Method** option to pull the address on file, or select the **New Payment Method** option to enter new address details:\
7. In this case, we’ll select **ACH (US Banks Only)** and then the **Use Existing Payment Method** option. And then click the **Next** button to proceed to the next step:\
8. To complete the process, check the box to agree to the **Terms of Service and Privacy Policy**. This acknowledgment is required:\
9. Finally, click the **Agree & Continue** button to complete the process. A confirmation message will appear stating: **Payment information submitted**:
This concludes the process of completing the invitation and selecting a preferred payment method, such as **ACH** or **Check**, in **Charted**.
---
# Agent Instructions
This documentation is published with GitBook. GitBook is the documentation platform designed so that both humans and AI agents can read, navigate, and reason over technical content effectively. Learn more at gitbook.com.
## Querying This Documentation
If you need additional information that is not directly available in this page, you can query the documentation dynamically by asking a question.
Perform an HTTP GET request on the current page URL with the `ask` query parameter, and the optional `goal` query parameter:
```
GET https://docs.charted.com/ap-automation/charted-features/payment-automation/completing-the-invitation-and-selecting-a-payment-method.md?ask=&goal=
```
`ask` is the immediate question: it should be specific, self-contained, and written in natural language.
`goal` is optional and describes the broader end goal you are ultimately trying to accomplish on behalf of the user. GitBook uses it to tailor the answer towards what is most useful for that goal.
The response will contain a direct answer to the question and relevant excerpts and sources from the documentation.
Use this mechanism when the answer is not explicitly present in the current page, you need clarification or additional context, or you want to retrieve related documentation sections.