> For the complete documentation index, see [llms.txt](https://docs.charted.com/ap-automation/llms.txt). Markdown versions of documentation pages are available by appending `.md` to page URLs; this page is available as [Markdown](https://docs.charted.com/ap-automation/charted-configuration/on-premise-check-printing/entering-bank-details-routing-and-fractional-micr-numbers.md).
# Entering Bank Details, Routing & Fractional MICR Numbers
### Abstract
Administrators must configure essential banking information on the *CPB Check Format* page to ensure accurate check printing. Supplying correct account, routing, and fractional MICR details helps prevent processing errors and ensures compatibility with bank-specific requirements.
This guide provides step-by-step instructions for entering company header text, bank account details, and fractional *MICR* routing numbers in the *CPB Check Format* configuration.
### Entering Bank Details and MICR Information in Check Format
Check formats must include complete and accurate bank data to ensure checks are printed with valid account and routing information. These details are essential for bank acceptance and vary depending on region and institution.
Follow these steps to configure the banking information:
1. To begin setting up a check format, navigate by hovering over the **Setup** menu, then go to **Check Printing**, and select **Check Format** > **New** to create a new format:\
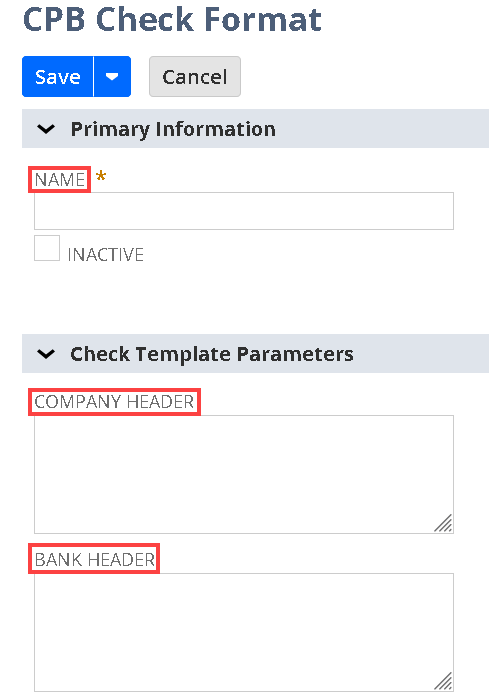
2. Once you're on the setup screen, enter a name for the check format in the NAME field, then company header information in the **COMPANY HEADER** and **BANK HEADER** fields. This information will appear at the top of printed checks:\
3. Next, leave the **CHECK MICR FONT** field unchanged, as it is pre-set by default and does not require modification:\
\
\
If no font is selected, the system will use the default **E13B MICR** font. You can optionally upload and assign a different **MICR** font if required.
4. Finally, enter your bank account number, routing number, and fractional routing number in the appropriate fields. Be sure to enter the bank account number without spaces, and use the check routing number provided by your bank — not the wire routing number. The fractional routing number should be entered using both **FRACTIONAL ROUTING NUMBER LINE 1** and **FRACTIONAL ROUTING NUMBER LINE 2** fields.\
\
\
\
When entering the fractional routing number, note that it appears on printed checks in a format like **12-1234/1210**. This number helps identify the specific banking region or branch. While some customers may assume it's unnecessary if using the same bank, banks in different regions (e.g., **California vs. New Jersey**) often require distinct fractional routing numbers. Make sure to confirm the correct format with your bank based on location.\
This concludes the process of entering bank details, routing, and fractional **MICR** numbers on the **CPB Check Format** page.
---
# Agent Instructions
This documentation is published with GitBook. GitBook is the documentation platform designed so that both humans and AI agents can read, navigate, and reason over technical content effectively. Learn more at gitbook.com.
## Querying This Documentation
If you need additional information that is not directly available in this page, you can query the documentation dynamically by asking a question.
Perform an HTTP GET request on the current page URL with the `ask` query parameter, and the optional `goal` query parameter:
```
GET https://docs.charted.com/ap-automation/charted-configuration/on-premise-check-printing/entering-bank-details-routing-and-fractional-micr-numbers.md?ask=&goal=
```
`ask` is the immediate question: it should be specific, self-contained, and written in natural language.
`goal` is optional and describes the broader end goal you are ultimately trying to accomplish on behalf of the user. GitBook uses it to tailor the answer towards what is most useful for that goal.
The response will contain a direct answer to the question and relevant excerpts and sources from the documentation.
Use this mechanism when the answer is not explicitly present in the current page, you need clarification or additional context, or you want to retrieve related documentation sections.