> For the complete documentation index, see [llms.txt](https://docs.charted.com/ap-automation/llms.txt). Markdown versions of documentation pages are available by appending `.md` to page URLs; this page is available as [Markdown](https://docs.charted.com/ap-automation/charted-configuration/advanced-vendor-onboarding/setting-up-onboarding-forms.md).
# Setting Up Onboarding Forms
### **Abstract**
Administrators often need to configure an advanced form-building solution that offers more flexibility and control over form creation and distribution. This configuration ensures that essential options — such as attachment settings, external domain configurations, and user-facing messaging — are aligned with specific organizational requirements. A common use case might include creating specialized vendor onboarding forms that handle varied requirements for different vendor types or regions, while maintaining consistency and compliance.
This article provides an overview of how to enable and configure the *Advanced Form Builder*, focusing on key settings like enabling or disabling the feature, managing attachment folders, and customizing external domain settings. It also covers the creation of specialized vendor forms, demonstrating how administrators can tailor form content, email details, and the overall user experience.
By following these processes, you can streamline form-related workflows while ensuring that vital configuration elements remain consistent and well-organized.
### **Enabling and Configuring the Advanced Form Builder**
Enabling the *Advanced Form Builder* provides administrators with a streamlined interface for creating, editing, and deploying custom forms within your organization. This feature includes various settings — such as the *Form Attachment Folder ID*, *External Domain Name*, and *SSL* configuration — that you can tailor to match specific use cases.
Before proceeding, consider whether you need to integrate with an external domain or *SSL*, especially if you plan to deploy forms via *SSP (SuiteScript Server Pages)* or a similar environment.
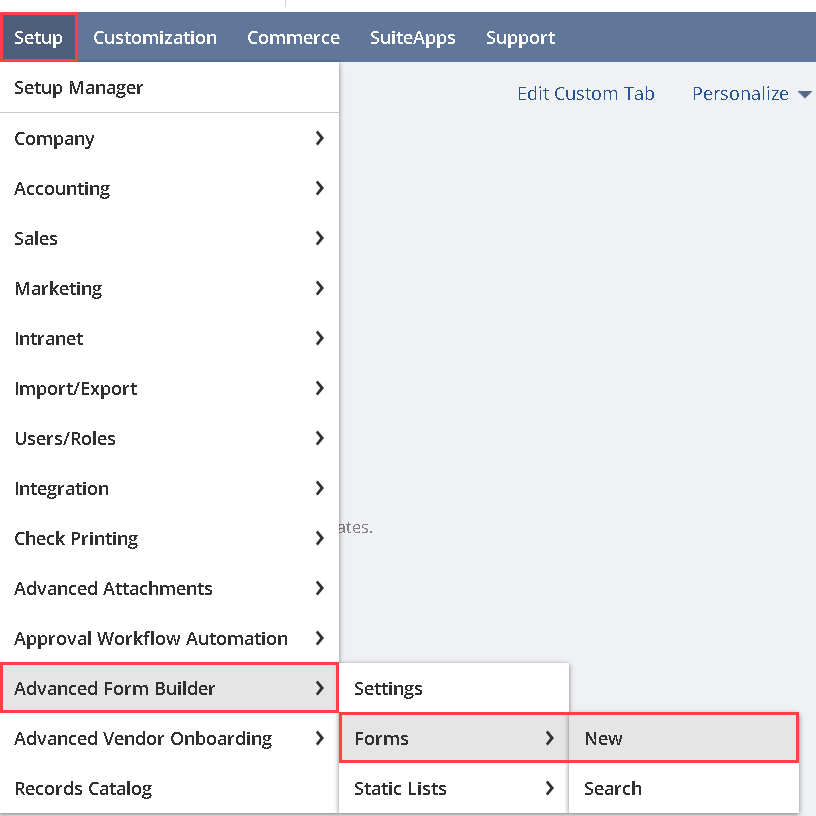
1. If you want to enable or disable the *Advanced Form Builder,* go to your **Setup** dropdown, select the **Advanced Form Builder** tab, and click the **Settings** option:\
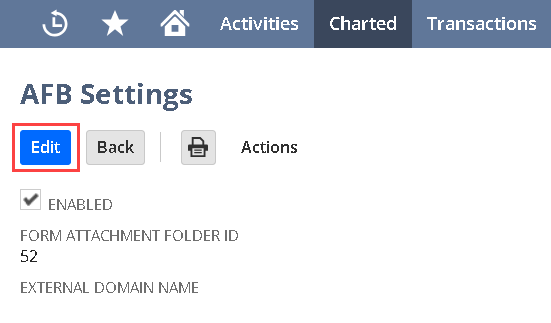
This navigates you to the main *AFB Settings* page, where you can modify feature availability:\
2. To adjust AFB availability, click **Edit** on the *AFB Settings* page:\
This unlocks the option to toggle the feature enable or disable:
\
Whenever you want to enable or disable the *Advanced Form Builder*, check (or uncheck) the **Enabled** box.
3. Once you are ready to manage form attachment storage, review the **FORM ATTACHMENT FOLDER ID** field:\
Remember that this is automatically generated during installation. Although it is editable, it is generally advised not to modify it unless you have a specific requirement, as changing it can impact how attachments are organized.\
4. If you need to specify a custom domain for *SSP* enabled forms, configure the **EXTERNAL DOMAIN NAME** and **EXTERNAL DOMAIN SSL** fields:\
Ensure these fields are populated only if you are using *SSP* for form deployment. If you are unsure about your *SSP* status, check with your onboarding manager or IT team before making changes.
5. Once you finish adjusting any relevant settings, click the **Save** button:
Ensure you only configure these if you know your account has *SSP* enabled; otherwise, leave them blank.
### **Creating and Customizing a Vendor Form**
Creating vendor forms allows you to gather critical information — such as contact details, tax documents, or region-specific compliance data — directly from your suppliers. By customizing each form, you ensure that only the necessary fields and instructions are displayed, reflecting the unique requirements of various vendor types (e.g., US-based suppliers, international contractors, or specialized service providers).
1. To develop a new vendor form, go to the **Advanced Form Builder** section under **Setup**, click **Forms,** and choose **New** to initiate the creation of a new form:\
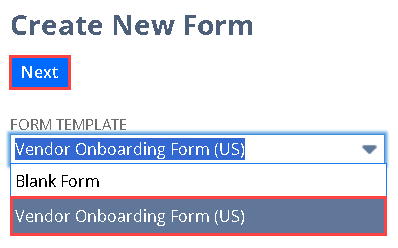
2. Whenever you want to build upon an existing structure, select a **Form Template** (e.g., a default *Vendor Onboarding Form (US) or Blank Form*) and click the **Next** button:\
Preview the default form content to understand which fields and instructions are included out-of-the-box:\
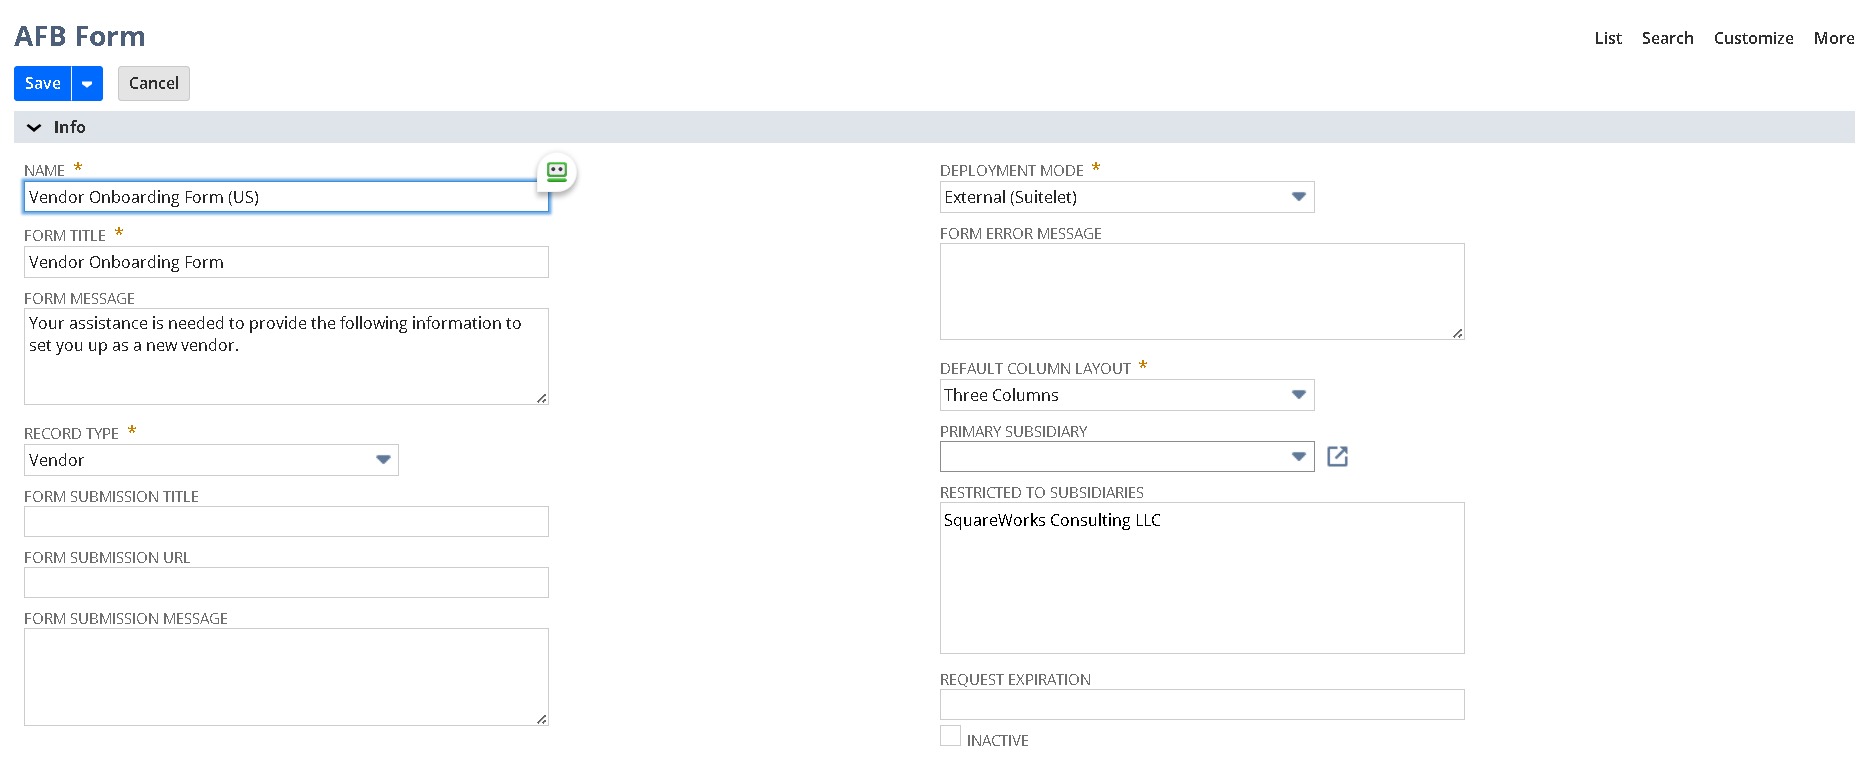
3. To make the form easy to identify, choose a **Form Name**:
Maintain naming conventions that differentiate vendor types or geographic regions, such as *Vendor Onboarding Form (US)* or *Vendor Onboarding Form (APAC)*.
4. When you need to tailor the messaging for vendors, update the **Form Title, Form Message**, and any other on-screen text:
Remember that vendors will see these elements, so keep them clear, concise, and relevant to the vendor onboarding process.
5. To define how email notifications are sent, specify the **Email From** address, **Email Subject**, **Message Header**, and **Email** **Message Footer**:
\
Consider using a catch-all address (e.g., ) rather than a personal employee email to maintain consistency and professionalism.
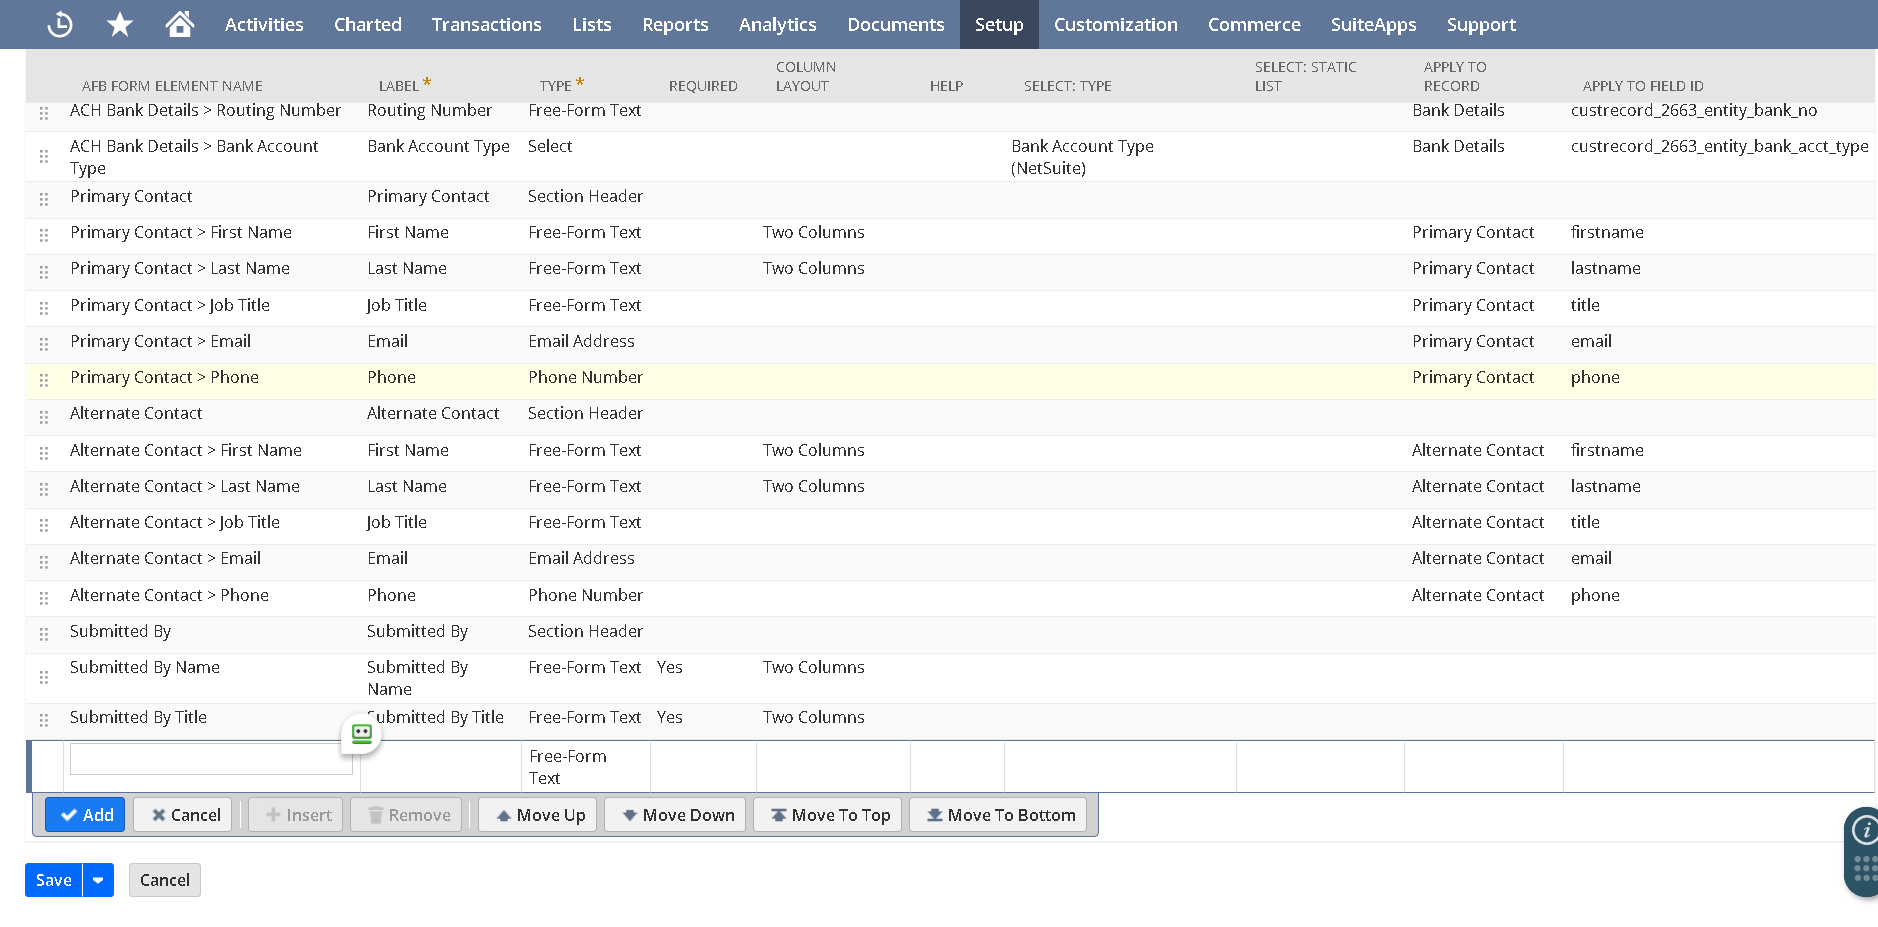
6. To add a new field, scroll down to the table at the bottom of the page. Enter the following details and then press 'OK' to create a new field. The order
1. AFB Form Element: descriptive identifier for the field name, for internal purposes only
2. Label: the name of the field that is displayed to your vendor on the form
3. Type: Field type. Can be Free-Form, document upload, hyperlink, etc. Most fields are free-form
4. Required: if checked, this field must be submitted by the customer
5. Column layout: if you'd like the field to take up the whole page, select one-column. If you'd like to share a row with one or more fields, select two or three columns
6. Help: helper text that is displayed at the bottom of the field
7. Apply to Record: which record type in netsuite that you would like to send this field to, once applied and submitted
8. Apply to Field ID: the name of the field (belonging to 'Apply to Record') in netsuite that you would like to send this field to, once applied and submitted.
7. If you'd like to delete a field, select the field you'd like to delete and press 'Remove'.
8. If you'd like to re-organize a field in the page, you can either press 'Move Up', 'Move Down', 'Move to Top', or 'Move to Bottom'. You can also drag and drop the column by selecting the 6 dots in the first column
9. After you finalize your form settings, click the **Save** button at the bottom of the page
10. If you'd like to preview the form or email after the page is saved, press 'Preview Form' and 'Preview Email' found both at the top and the bottom of the page.
---
# Agent Instructions
This documentation is published with GitBook. GitBook is the documentation platform designed so that both humans and AI agents can read, navigate, and reason over technical content effectively. Learn more at gitbook.com.
## Querying This Documentation
If you need additional information that is not directly available in this page, you can query the documentation dynamically by asking a question.
Perform an HTTP GET request on the current page URL with the `ask` query parameter, and the optional `goal` query parameter:
```
GET https://docs.charted.com/ap-automation/charted-configuration/advanced-vendor-onboarding/setting-up-onboarding-forms.md?ask=&goal=
```
`ask` is the immediate question: it should be specific, self-contained, and written in natural language.
`goal` is optional and describes the broader end goal you are ultimately trying to accomplish on behalf of the user. GitBook uses it to tailor the answer towards what is most useful for that goal.
The response will contain a direct answer to the question and relevant excerpts and sources from the documentation.
Use this mechanism when the answer is not explicitly present in the current page, you need clarification or additional context, or you want to retrieve related documentation sections.